Quantcast
Channel: BizTalk Guru
Viewing all 56 articles
Browse latest View live

BizTalk : Q&A : Read Repeating Namepair values using XSLT for-each

$
0
0
Q: Hi i have a strange issue with matching specific attribute of xml node. Example code that doesnt work:
<xsl:for-each select="../../unit/service/price/season[@name=$period_name]">
<xsl:attribute name="std_bed_price">
<xsl:value-of select="../@amount"/>
</xsl:attribute>
</xsl:for-each>
Example code that DOES work but i don't like this way too much:
<xsl:for-each select="../../unit/service/price/season">
<xsl:if test="@name = $period_name">
<xsl:attribute name="std_bed_price">
<xsl:value-of select="../@amount"/>
</xsl:attribute>
</xsl:if>
</xsl:for-each>
If in first example i replace the variable name with some of the values like 'A' it works, i also tested what variable name is selected and it has the correct data inside (so, 'A','B','C' ...)
Anyone had this problem before?

A: You might try changing it to an apply-templates instead of a foreach. Something like the following should work.
<xsl:template match="price">
<xsl:attribute name="std_bed_price">
<xsl:value-of select="@amount" />
</xsl:attribute>
</xsl:template>
And then call it like:
<xsl:apply-template select="../../unit/service/price/[season/@name=$period_name]" />
or

select="../../unit/service/price/season[./@name=$period_name]

BizTalk : How To : Map Repeating Sequence Elements

$
0
0
source: paul petrov


Repeating sequence groups can often be seen in real life XML documents. It happens when certain sequence of elements repeats in the instance document. Here's fairly abstract example of schema definition that contains sequence group:
<xs:schema xmlns:b="http://schemas.microsoft.com/BizTalk/2003"
           xmlns:xs="http://www.w3.org/2001/XMLSchema"
           xmlns="NS-Schema1"
           targetNamespace="NS-Schema1" >
  <xs:element name="RepeatingSequenceGroups">
    <xs:complexType>
      <xs:sequence maxOccurs="1" minOccurs="0">
        <xs:sequence maxOccurs="unbounded">
          <xs:element name="A" type="xs:string" />
          <xs:element name="B" type="xs:string" />
          <xs:element name="C" type="xs:string" minOccurs="0" />
        </xs:sequence>
      </xs:sequence>
    </xs:complexType>
  </xs:element>
</xs:schema>
And here's corresponding XML instance document:
<ns0:RepeatingSequenceGroups xmlns:ns0="NS-Schema1">
  <A>A1</A>
  <B>B1</B>
  <C>C1</C>
  <A>A2</A>
  <B>B2</B>
  <A>A3</A>
  <B>B3</B>
  <C>C3</C>
</ns0:RepeatingSequenceGroups>
As you can see elements A, B, and C are children of anonymous xs:sequence element which in turn can be repeated N times. Let's say we need do simple mapping to the schema with similar structure but with different element names:
<ns0:Destination xmlns:ns0="NS-Schema2">
  <Alpha>A1</Alpha>
  <Beta>B1</Beta>
  <Gamma>C1</Gamma>
  <Alpha>A2</Alpha>
  <Beta>B2</Beta>
  <Gamma>C2</Gamma>
</ns0:Destination>
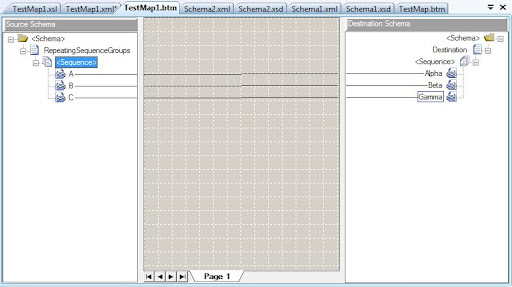
The basic map for such typical task would look pretty straightforward:
If we test this map without any modification it will produce following result:
<ns0:Destination xmlns:ns0="NS-Schema2">
  <Alpha>A1</Alpha>
  <Alpha>A2</Alpha>
  <Alpha>A3</Alpha>
  <Beta>B1</Beta>
  <Beta>B2</Beta>
  <Beta>B3</Beta>
  <Gamma>C1</Gamma>
  <Gamma>C3</Gamma>
</ns0:Destination>
The original order of the elements inside sequence is lost and that's not what we want. Default behavior of the BizTalk 2009 and 2010 Map Editor is to generate compatible map with older versions that did not have ability to preserve sequence order. To enable this feature simply open map file (*.btm) in text/xml editor and find attribute PreserveSequenceOrder of the root <mapsource> element. Set its value to Yes and re-test the map:
<ns0:Destination xmlns:ns0="NS-Schema2">
  <Alpha>A1</Alpha>
  <Beta>B1</Beta>
  <Gamma>C1</Gamma>
  <Alpha>A2</Alpha>
  <Beta>B2</Beta>
  <Alpha>A3</Alpha>
  <Beta>B3</Beta>
  <Gamma>C3</Gamma>
</ns0:Destination>
The result is as expected – all corresponding elements are in the same order as in the source document. Under the hood it is achieved by using one common xsl:for-each statement that pulls all elements in original order (rather than using individual for-each statement per element name in default mode) and xsl:if statements to test current element in the loop:
  <xsl:template match="/s0:RepeatingSequenceGroups">
    <ns0:Destination>
      <xsl:for-each select="A|B|C">
        <xsl:if test="local-name()='A'">
          <Alpha>
            <xsl:value-of select="./text()" />
          </Alpha>
        </xsl:if>
        <xsl:if test="local-name()='B'">
          <Beta>
            <xsl:value-of select="./text()" />
          </Beta>
        </xsl:if>
        <xsl:if test="local-name()='C'">
          <Gamma>
            <xsl:value-of select="./text()" />
          </Gamma>
        </xsl:if>
      </xsl:for-each>
    </ns0:Destination>
  </xsl:template>
BizTalk Map editor became smarter so learn and use this lesser known feature of XSLT 2.0 in your maps and XSL stylesheets.

BizTalk : How To : Save suspended messages in BizTalk Vb Script

$
0
0

Last week, I needed to save 700+ suspended messages to file. I didn’t want to go in to each instance and click ‘save to file’ 700 times. A quick search in the web did not find what I want, however there were a number of articles about extracting messages from the BizTalk tracking database. One of which is this excellent article by Thiago Almeida.
My scenario was for an existing BizTalk 2004 implementation in the company and is only a once-off thing I need to do. For the newer BizTalk 2006 applications, there is the ‘Failed Message Routing’ feature that can be enabled on send ports and receive ports. The failed messages could then be easily subscribed to a send port to output to file.
Then it occured to me that the WMI script Terminate.vbs has the option to save the messages before terminating the instances (http://go.microsoft.com/fwlink/?LinkID=107591 and slightly updated for 2009). Thus changing this script to do what I want required the least effort. I could just use the script as it is to save all the messages and terminate the instances. However it didn’t take much to modify it to take a parameter for filtering on an instance name and to only save messages (and not terminate them). Below is the usage description of the save_messages.vbs script and the actual script. It works for BizTalk 2004, 2006 and 2009.
There is also a replacement of the Terminate.vbs script: Biztalk Terminator.
Usage:
cscript save_messages.vbs < -Z | -A | -DIS | -SR | -SNR > [Port/Orchestration name]
-Z saves all “Zombie” instances (e.g. completed with discarded messages)
-A saves all suspended and zombie instances as well as all routing failure reports
-SR saves suspended resumable instances only
-SNR saves suspended non-resumable instances only
-DIS saves all dehydrated ‘isolated adapter’ instances
optionally supply the name of the orchestration or port name to filter on specific instances
Ensure that the C:\Temp folder exists before running as that is where it saves the instances
Example: cscript save_messages.vbs -z “E-Reporting Data Transform Port”
Visual Basic Script:
‘ save_messages.vbs
‘ Enter save_messages.vbs with no arguments from a command prompt for usage
‘ This script needs to be run under a user account that is a member of the BizTalk Administrators
‘ group. This script needs to be run on a machine that is configured with BizTalk administration
‘ tools.
dim objBtsWmiNS, objMsg, svcinsts, inst, msg, ndx, size
Dim aryHostNames()
Dim aryObjQueues()
Dim aryHostBatchSize()
Dim strKey2Instance
Dim strQuery2Msg
Dim strServiceName
On Error Resume Next
Dim objArgs: Set objArgs = WScript.Arguments
If ( objArgs.Count = 0 OR objArgs.Count > 2) Then
PrintUsage()
wscript.quit 0
End If
wmiQuery = “”
‘ServiceStatus = 16 – ‘Completed With Discarded Messages’ in BizTalk Server 2004
‘ServiceStatus = 32 – ‘Suspended (not resumable)’
‘ServiceStatus = 4 – ‘Suspended (resumable)’
‘ServiceClass = 64 – ‘Routing Failure Report’
‘ErrorId = “0xC0C01B4C” – is how ‘Completed With Discarded Messages’ are exposed in BizTalk Server 2006
If (objArgs(0) = “-Z” OR objArgs(0) = “-z”) Then
wmiQuery = “select * from MSBTS_serviceinstance where ServiceStatus=16 OR ErrorId=’0xC0C01B4C’”
End If
If (objArgs(0) = “-A” or objArgs(0) = “-a”) Then
wmiQuery = “select * from MSBTS_serviceinstance where ServiceStatus=4 OR ServiceStatus=32 OR ServiceStatus=16 OR ErrorId=’0xC0C01B4C’ OR ServiceClass=64″
End If
If (objArgs(0) = “-SR” or objArgs(0) = “-sr”) Then
wmiQuery = “select * from MSBTS_serviceinstance where ServiceStatus=4″
End If
If (objArgs(0) = “-SNR” or objArgs(0) = “-snr”) Then
wmiQuery = “select * from MSBTS_serviceinstance where ServiceStatus=32″
End If
If (objArgs(0) = “-DIS” or objArgs(0) = “-dis”) Then
wmiQuery = “select * from MSBTS_serviceinstance where ServiceClass=32 AND ServiceStatus=8″
‘ServiceClass = 32 ‘Isolated Adapter
‘ServiceStatus = 8 ‘Dehydrated
End If
saveMessagesBeforeTermination = True
If ( objArgs.Count > 1) Then
strServiceName = objArgs(1)
End If
If(wmiQuery = “”) Then
PrintUsage()
wscript.quit 0
End If
wscript.echo “–>Connecting to BizTalk WMI namespace”
Set objBtsWmiNS = GetObject(“WinMgmts:{impersonationLevel=impersonate, (security)}\\.\root\MicrosoftBizTalkServer”)
If Err <> 0 Then
CheckWMIError
wscript.quit 0
End If
wscript.echo “–>Getting BizTalk host collection”
Set hosts = objBtsWmiNS.ExecQuery(“select * from MSBTS_HostSetting”)
If Err <> 0 Then
CheckWMIError
wscript.quit 0
End If
hostCount = hosts.count
ReDim aryHostNames(hostCount – 1)
ReDim aryObjQueues(hostCount – 1)
ReDim aryHostBatchSize(hostCount – 1)
wscript.echo “–>Retrieve BizTalk host names and loading host queues”
ndx = 0
For Each host in hosts
wscript.echo “Found host ” & host.Properties_(“Name”)
aryHostNames(ndx) = host.Properties_(“Name”)
Set aryObjQueues(ndx) = objBtsWmiNS.Get(“MSBTS_HostQueue.HostName=”"” & aryHostNames(ndx) & “”"”)
If Err <> 0 Then
CheckWMIError
wscript.quit 0
End If
ndx = ndx + 1
Next
wscript.echo “–>Getting collection of service instances”
Set svcinsts = objBtsWmiNS.ExecQuery(wmiQuery)
‘Iterate through instances and save them in host-specific arrays.
wscript.echo “–>Start iterating service instances”
totalCount = 0
For Each inst in svcinsts
If (objArgs.Count = 1 Or (objArgs.Count > 1 And strServiceName = inst.Properties_(“ServiceName”) ) ) Then
wscript.echo “Found suspended instance “”" & inst.Properties_(“ServiceName”) & “”" on host ” & inst.Properties_(“HostName”)
‘Resolve host index
For hostIdx = 0 To hostCount-1
If aryHostNames(hostIdx) = inst.Properties_(“HostName”) Then
Exit For
End If
Next
’16 is an internal service class that cannot be terminated
If 16 = inst.Properties_(“ServiceClass”) Then
wscript.echo “Skipping BizTalk internal service instances (they cannot be terminated anyway)”
Else
’64 is a routing failure report and doesn’t have messages that can be saved
If 64 = inst.Properties_(“ServiceClass”) Or 16 = inst.Properties_(“ServiceClass”) Then
saveMessagesBeforeTermination = False
End If
errorCountSavingMessages = 0
If saveMessagesBeforeTermination Then
strQuery2Msg = “select * from MSBTS_MessageInstance where ServiceInstanceID=”"” & inst.Properties_(“InstanceId”) & “”"”
Set msgInsts = objBtsWmiNS.ExecQuery(strQuery2Msg)
For Each msg in msgInsts
msg.SaveToFile “C:\Temp”
If Err <> 0 Then
CheckWMIError
wscript.echo “Failed to save MSBTS_MessageInstance”
wscript.echo Err.Description & Err.Number
errorCountSavingMessages = errorCountSavingMessages + 1
Else
wscript.echo “Saved message ” & msg.Properties_(“MessageInstanceID”)
End If
Next
End If
totalCount = totalCount + 1
End If
End If
Next
‘ Delete whatever is left
For hostIdx = 0 To hostCount-1
If aryHostBatchSize(hostIdx) > 0 Then
TerminateAccumulatedInstacesForHost hostIdx
End If
Next
wscript.echo “SUCCESS> ” & totalCount & ” instances were found and attempted to be saved”
‘This subroutine deals with all errors using the WbemScripting object.
‘Error descriptions are returned to the user by printing to the console.
Sub CheckWMIError()
If Err <> 0 Then
On Error Resume Next
Dim strErrDesc: strErrDesc = Err.Description
Dim ErrNum: ErrNum = Err.Number
Dim WMIError : Set WMIError = CreateObject(“WbemScripting.SwbemLastError”)
If (TypeName(WMIError) = “Empty” ) Then
wscript.echo strErrDesc & ” (HRESULT: ” & Hex(ErrNum) & “).”
Else
wscript.echo WMIError.Description & “(HRESULT: ” & Hex(ErrNum) & “).”
Set WMIError = nothing
End If
‘wscript.quit 0
End If
End Sub
Sub PrintUsage()
wscript.echo “Usage:”
wscript.echo “cscript save_messages.vbs < -Z | -A | -DIS | -SR | -SNR > [Port/Orchestration name]“
wscript.echo
wscript.echo “  -Z saves all “”Zombie”" instances (e.g. completed with discarded messages)”
wscript.echo “  -A saves all suspended and zombie instances as well as all routing failure reports”
wscript.echo “  -SR saves suspended resumable instances only”
wscript.echo “  -SNR saves suspended non-resumable instances only”
wscript.echo “  -DIS saves all dehydrated ‘isolated adapter’ instances”
wscript.echo “  optionally supply the name of the orchestration or port name to filter on specific instances”
wscript.echo
wscript.echo “  Ensure that the C:\Temp folder exists before running as that is where it saves the instances”
wscript.echo
wscript.echo “  Example: cscript save_messages.vbs -z “”E-Reporting Data Transform Port”"”
wscript.echo
End Sub

BizTalk : How To : Call .Net Component inside Biztalk mapper using XSLT call template PART 1

$
0
0

post by  Richard Seroter
I encountered a particularly tricky multi-part mapping scenario. I had to build a destination message that contained groupings from the two source messages. Each record in the first source message created a destination node, and each record in the second source message created a destination node directly beneath the related first source record. To make matters tougher, every destination record has an attribute containing a sequential number. So out of this …
<source1>
  <Node1><Node1>
  <Node2></Node2>
</source1>
<source2>
  <NodeRelatedToNode1></NodeRelatedToNode1>
  <NodeRelatedToNode1></NodeRelatedToNode1>
  <NodeRelatedToNode2></NodeRelatedToNode2>
</source2>
The destination was supposed to look like this …
<destination>
  <Node1 page=”1″><Node1>
  <NodeRelatedToNode1 page=”2″></NodeRelatedToNode1>
  <NodeRelatedToNode1 page=”3″></NodeRelatedToNode1>
  <Node2 page=”4″></Node2>
  <NodeRelatedToNode2 page=”5″></NodeRelatedToNode2>
</destination>
The grouping part wasn’t too tough, just used a Scripting functoid with the XSLT Call Templateand a little hand written XSL. The hard part was creating the sequential “page” numbers. Those familiar with XSLT know that the “variables” in XSLT are basically constants, so you can’t create a variable and increment it. I considered building some sort of recursion to get my incremented number, but in the end, decided to call a custom .NET component from my map’s XSLT. I built a C# component that had a member variable, and a method called “GetNext()” which incremented and then returned the next sequential number. I then set my map’s Custom Extension XML to an XML document referencing my custom component. Now in my XSLT Call Template I could get the next “page” number each time I built a destination node. Neat!
See here for an example of doing this.
Here’s where a “quirk” was introduced. When I deployed this map, and ran multiple documents through it, the first document had it’s paging correct (e.g. pages 1-5), but the next messages had the wrong values (e.g. 6-10, 11-16, etc). What was happening was that somehow this custom C# component was being shared! The “increment” kept counting on each orchestration call! My C# component wasn’t built as a “static” object, and I assumed that the scope of each custom object was the individual map (or orchestration) instance.
I still have no idea why this happened, but to ensure it wouldn’t keep happening, I added a method to the custom component called “Reset()” which set the counter to 0. Then at the top of the map I call out to that method to ensure that each map starts its counter at 0.

BizTalk : How To : Call .Net Component inside Biztalk mapper using XSLT call template PART 2

$
0
0
post by  Richard Seroter

A problem I mentioned was that the member variable in the class that the map was calling seemed to be getting shared amongst execution instances. Each map creates a sequential page number in the XSLT and puts it into the destination XML. However, I’d see output where the first message had pages “1..3..5..7..8″ and the second message had pages “2..4..6..9.” Very strange. I thought I fixed the problem, but it surfaced today in our Test environment.
So, I set out to keep everything local to the map and get rid of external assembly calls. After banging my head for a few minutes, I came up the perfect solution. I decided to mix inline script with inline XSLT. “Madness” you say? I built a small test scenario. The map I constructed looks like this:
In the first Scripting functoid, I have “inline C#” selected, and I created a global variable. I then have a function to increment that variable and return the next number in sequence.
Did you know that you could have “global variables” in a map? Neat stuff. If I check out the XSLT that BizTalk generates for my map, I can see my function exposed as such:
Now I know how to call this within my XSLT! The second Scripting functoid’s inline XSLT looks like this:

Notice that I can call the C# method written in the previous functoid with this code:
<xsl:value-of select=”userCSharp:GetPageNumber()”/>
The “prefix” is the auto-generated one from the XSLT. Now, all the calculations are happening locally within the map, and not relying on outside components. The result of this map is a document that looks like this:
There you go. Using global variables within a BizTalk map and calling a C# function from within the XSLT itself.

BizTalk : How To : Trouble Shoot BAM EventBus Service Error in Event Log

$
0
0
post by Tiho

Here are 8 tables in each BizTalk Message Box database which store the tracking data before it is imported by the BAM EventBus Service (a.k.a. TDDS or Tracking Data Decoding Service) into the DTA/HAT and the BAM Primary Import databases. The tables are named TrackingData_x_y where 0 ≤ x ≤ 1 and 0 ≤ y ≤ 3. It is absolutely critical that the sizes of these tables do not increase over time. If the sizes are increasing than either TDDS is not able to catch up with the load or it is not working properly. There is a performance counter that can be used to monitor the size of the tracking data – BizTalk:Messsage Box:General Counters\Tracking Data Size.

The first step to troubleshoot issues with the tracking data is to examine the Windows Event Log on the BizTalk Tracking Host machine for errors from the BAM EventBus Service. Error information along with the serialized original tracking data might be available in the TDDS_FailedTrackingData tables in the DTA/HAT and the BAM Primary Import databases. Another place where error information might be available is the TDDS_Heartbeats table in the BizTalk Management database.

In this post I will focus on one very common cause which manifests as an error from the BAM EventBus Service in the Windows Event Log with event ID 25. 

The error should look like this:
Event Type: Error
Event Source: BAM EventBus Service
Event Category: None
Event ID: 25
Date: 12/20/2006
Time: 10:38:27 AM
User: N/A
Computer: TRACKINGHOST
Description:
Either another TDDS is processing the same data or there is an orphaned 
session in SQL server holding TDDS lock.Timeout expired. The timeout
period elapsed prior to completion of the operation or the server is not
responding. SQLServer: DBSERVER, Database: BAMPrimaryImport.

This error will usually show up every 5 minutes or so. Below are the steps to resolve it.
First, make sure that you are not hitting any of the issues described in this article. If this is the case, then killing the orphaned sessions or restarting the SQL Server machine will resolve the issue. You can use the information in this article to identify orphaned sessions.
If the issue is still there, then you most certainly have permissions problems. The account under which TDDS (and the BizTalk Tracking Host) is running must have execute permissions for the following stored procedures in the BizTalk Message Box database: TDDS_RedisterTDDSAccess and TDDS_GetNumTrackingPartitions. The same account must also have execute permissions for the TDDS_Lock stored procedure in the DTA/HAT and the BAM Primary Import databases.

The permissions are set correctly when BizTalk Server is first installed but might be altered later directly or indirectly by manually setting explicit deny permissions for the specific account or any group that it is a member of.
The best way to check that permissions are indeed the problem is to open Task Manager on the Tracking Host machine and on the Processes tab check the account under which the BTSNTSvc.exe process is running. This is the Tracking Host account. Now start SQL Query Analyzer or SQL Management Studio (or any of the command line counterparts) with the same user credentials as BTSNTSvc.exe. You can use the “runas” command or right-click on a shortcut and choose “Run as…”. I suggest that you do this test on the Tracking Host machine to rule out any network connectivity issues.
After you have connected to the correct SQL database execute the following:

In all BizTalk Message Box databases:

DECLARE @RC int
DECLARE @retVal int
EXEC @RC = [BizTalkMsgBoxDb].[dbo].[TDDS_RegisterTDDSAccess] @retVal OUTPUT
SELECT @RC
GO

DECLARE @RC int
DECLARE @nPartitions tinyint
EXEC @RC = [BizTalkMsgBoxDb].[dbo].[TDDS_GetNumTrackingPartitions] @nPartitions OUTPUT
SELECT @RC
GO

In the BizTalk DTA and BAM Primary Import databases:
DECLARE @RC int
DECLARE @resource nvarchar(128)
DECLARE @milisecTimeout int
DECLARE @retVal int
SELECT @resource = N'Foo'
SELECT @milisecTimeout = 5000
EXEC @RC = [BAMPrimaryImport].[dbo].[TDDS_Lock] @resource, @milisecTimeout, @retVal OUTPUT
SELECT @retVal
SELECT @RC
GO

The results of these queries should be 0 and there should not be any errors. If you get “EXECUTE permission denied” errors then grant the corresponding execute permissions until you can execute the queries without any errors. At this point TDDS should start moving the tracking data from the Message Box databases to the DTA and the BAM databases.

BizTalk : How To : Call a Web service Using Custom Pipeline in a Messaging Solution

$
0
0


In this article I'll explain how you can call a Web Service which requires multiple arguments using a Custom pipeline and a custom pipeline component in a messaging-only scenario without using any Orchestration.

Normally, when there is a requirement to call a web service from BizTalk, people tend to take the easy route of calling it via an Orchestration. When we do a web reference inside the orchestration, Orchestration does quite a lot of work for us. It creates all the required schemas, it creates all the required multipart messages, which will be passed to the web service as argument. It makes our life easier. But I guess like me, some of you out there might need to call the web service without using Orchestration. As shown in the above figure. I've one request-response HTTP receive port, and one Solicit response SOAP send port, through this I'm going to call a web service, which expects multiple argument (including one complex type) and return the result back to the caller (HTTP Response). Here are the steps: The attached sample file contains all the required file, I'm just going to explain the key factors in this article.
1. Web Service Definition:
[WebMethod]
public Person GetPersonInfo(Person person, string firstName, string secondName) {
//Some processing
return person;
}
2. Create a general custom pipeline component to construct the multipart message required for the Web Service call 
At run time SOAP Adapter in the send port will map the Biztalk multipart IBaseMessage to the Web Service argument based on the partName of IBaseMessage and argument names of the Webservice. The key factor is how we are going to construct the multipart message in the format required by the SOAP Adapter to make the WebService call. So, in this article we are going to create custom pipeline component which will construct the correct IBaseMessage required by the SOAP adapter based on the input message and some pipeline design time properties
The custom pipeline component we are going to use has 2 design time properties FirstName and SecondName, which will be passed as parameters to the web service (See webservice definition from Step 1). We'll pass the first webservice argument "Person" as the incoming message via HTTP receive port. The figure below show the custom design time properties configuration window within Biztalk Admin console. 
The code below is the snippet from the custom pipeline component (two important methods Execute and CreateMessage). The Execute method below without the first line of code will be equivalent to aPassThru pipeline component with default Biztalk IBaseMessage. 
#############################################################
public Microsoft.BizTalk.Message.Interop.IBaseMessage Execute(IPipelineContext pc, IBaseMessage inmsg)
{
IBaseMessage msg = CreateMessage(inmsg.BodyPart.GetOriginalDataStream(), pc.GetMessageFactory(),inmsg.Context);
return msg;
}
#############################################################
IBaseMessage CreateMessage(Stream s, IBaseMessageFactory msgFactory, IBaseMessageContext context)
{
IBaseMessage msg = msgFactory.CreateMessage();
IBaseMessagePart part = msgFactory.CreateMessagePart();
part.Data = s;
msg.AddPart("Person", part, true);
msg.Context = context;
//1st Part
IBaseMessagePart partFirstName = msgFactory.CreateMessagePart();
byte[] firstPart = System.Text.Encoding.UTF8.GetBytes(string.Format("<string>{0}</string>", _firstName));
partFirstName.Data = new MemoryStream(firstPart);
partFirstName.Charset = "utf-8"
partFirstName.ContentType = "text/xml"
msg.AddPart("firstName", partFirstName, false);
//2nd Part
IBaseMessagePart partSecondName = msgFactory.CreateMessagePart();
byte[] secondPart = System.Text.Encoding.UTF8.GetBytes(string.Format("<string>{0}</string>", _secondName));
partSecondName.Data = new MemoryStream(secondPart);
partSecondName.Charset = "utf-8"
partSecondName.ContentType = "text/xml"
msg.AddPart("secondName", partSecondName, false);
return msg;
}
#############################################################
Our user defined function CreateMessage will create the required BizTalk IBaseMessage as shown in the below figure
In the above code snippet, the important things to note are highlighted in RED. The incoming message ("Person") will go as the first part (BodyPart) of the IBaseMessage with the name "Person", and then we added two more addional parts "firstName" and "secondName" to the IBaseMessage with correct partNames inline with the web service arguments. The other important thing to note is how the basic data types gets serialized. In our example we got "<string>{0}</string>" as value for firstName and secondName, because they are of type string. If for example you got int as your argument then you need to create the part in the format <int>5</int>.
NOTE: See the web service signature defined in Step 1 for comparison
3. Create a Custom Receive Pipeline using the custom pipeline component
Create a new Biztalk Receive Pipeline and place the custom pipeline component we created in the "Decode" stage of the pipeline.
4. Configure the ports
As shown in our design diagram at the beginning we need 2 ports to send and receive the message, the attached sample file got a binding file, this section is just for explanation, doesn't explain in detail how to configure the ports. Make sure the URL are correct, both on Receive and Send side after importing the binding. You need to configure IIS as well to receive messages via HTTP, follow the link to configure IIS for HTTP receive  http://msdn2.microsoft.com/en-us/library/aa559072.aspx.
Two-Way HTTP Receive Port:
Solicit-Response SOAP Send Port:
We used the .NET Proxy class on our SOAP port to make the call.
Filter Condition on the Send Port
5. Post a Message.
I used WFetch to post the message to BizTalk. You can see on the result pane the request message is posted and you got the response back from the web service synchronously on a two way connection.
Troubleshooting:
Some of the common exceptions you'll see while calling a webservice via SOAP adapter is shown below (from HAT and eventviewer)
1. "Failed to retrieve the message part for parameter "firstName". "
2. "Failed to serialize the message part "firstName" into the type "String" using namespace "". Please ensure that the message part stream is created properly."
The reason for the first error message is due to wrongly named IBaseMessage partName. ReadSection 2 carefully to overcome this error.
The reason for the second error message is mainly due to some problem with serializing the IBaseMessage parts to the correct web service arguments. Best approach to overcome this error will be to build a .net console/windows application, add a web reference to the webservice and try to serialize each argument to the corresponding type. For example for this example you can try the following
FileStream fs = new FileStream(@"C:\Documents and Settings\SaravanaK\Desktop\FailedMessages\_Person.out",FileMode.Open,FileAccess.Read);
XmlSerializer serialise = new XmlSerializer(typeof(LH.WebReference.Person));
LH.WebReference.Person per = (LH.WebReference.Person)serialise.Deserialize(fs);
fs.Close();
fs = new FileStream(@"C:\Documents and Settings\SaravanaK\Desktop\FailedMessages\_secondName.out",FileMode.Open,FileAccess.Read);
serialise = new XmlSerializer(typeof(string));
string s2 = (string)serialise.Deserialize(fs);
fs.Close();
The files "_Person.out" and "_secondName.out" are saved from HAT tool. See the exception detail and fix the issue, it will be some namespace issue or data issue.
Read the readme.txt file inside to configure it. Will take approximately 5-20 minutes based on your BizTalk knowledge level.

BizTalk : How To : Configure the Backup BizTalk Server Job

$
0
0


 How to Configure the Backup BizTalk Server Job

1.     On the computer that contains the BizTalk Management database, click Start, click Programs, click Microsoft SQL Server 2005, and then click SQL Server Management Studio.
2.     In the Connect to Serverdialog box, specify the name of the SQL Server where the BizTalk Server databases reside and the appropriate authentication type, and then click Connect.
3.     In Microsoft SQL Server Management Studio, double-click SQL Server Agent, and then click Jobs.
4.     In the details pane, right-click Backup BizTalk Server (BizTalkMgmtDb), and then click Properties.
5.     In the Job Properties - Backup BizTalk Server (BizTalkMgmtDb) dialog box, under Select a page, click Steps.
6.     In the Job step list, click BackupFull, and then click Edit.
7.     On the General page, in the Command box, edit the command, and then click OK.
exec [dbo].[sp_BackupAllFull_Schedule] 'd' /* Frequency */, 'BTS' /* Name */, '<destination path>' /* location of backup files */, 0 (default) or 1 /* ForceFullBackupAfterPartialSetFailure */

1.     Frequency: The default is d (daily). This is the recommended setting. Other values include h (hourly), w (weekly), m(monthly), or y (yearly).
2.     Name: The default is BTS. This is the recommended setting. The name is used as part of the backup file name.
3.     Location of backup files: Replace '<destination path>' with the full path (the path must include the single quotes) to the computer and folder where you want to back up the BizTalk Server databases.

Caution
To avoid potential data loss, you should specify a computer for your backup that is different from the computer with the original data.
Caution
If you specify a local path, then you have to manually copy all the files to the same folder on the destination system whenever the Backup BizTalk Server job creates new files. If you specify a remote path, it must be a UNC share such as \\<ServerName>\<SharedDrive>\, where <ServerName> is the name of the server where you want the files to be backed up using the Backup BizTalk Server Job, and <SharedDrive> is name of the shared folder.

4.     Force full backup after partial backup failures: The default is 0when not specified, which means that if a log backup fails, no full backups are done until the next full backup frequency interval is reached. Replace with 1if you want a full backup to be made whenever a log backup failure occurs.

8.     In the Job step list, click MarkAndBackupLog, and then click Edit.
The MarkAndBackupLog step is responsible for marking the logs and then backing them up.
9.     On the General page, in the Command box, replace '<destination path>'with the full path (including single quotes) to the computer and folder where you want to store the BizTalk Server database logs and then click OK. The <destination path> may be local or a UNC path to another server.

Description: http://i.msdn.microsoft.com/Aa546765.Caution(en-us,MSDN.10).gifCaution
To avoid potential data loss, the <destination path> should specify a computer to store the database logs that is different from the computer with the original database logs.

10.  In the Job step list, click Clear Backup History, and then click Edit.

11.  On the General page, in the Command box, change DaysToKeep=<number>to the number of days you want to keep the backup history, and then click OKtwice to close the Job Properties - Backup BizTalk Server (BizTalkMgmtDb)dialog box.

Description: http://i.msdn.microsoft.com/Aa546765.note(en-us,MSDN.10).gifNote
The DaysToKeep parameter specifies how long the backup history is kept in the Adm_BackupHistory table. Periodically clearing the backup history helps to maintain the Adm_BackupHistory table at an appropriate size. The default value for the DaysToKeep parameter is 14 days.

12.  Change the backup schedule, if desired. For more information, see How to Schedule the Backup BizTalk Server Job.

Description: http://i.msdn.microsoft.com/Aa546765.note(en-us,MSDN.10).gifNote
The Backup BizTalk Server job runs the first time you configure it. By default, on subsequent runs, the Backup BizTalk Server job performs a full backup once a day and performs log backups every 15 minutes.

13.  In the details pane, right-click the Backup BizTalk Serverjob, and then click Enable.
In the Enable Jobs dialog box, the status changes to Success.

BizTalk : How To : Configure the Destination System for Log Shipping

$
0
0

How to Configure the Destination System for Log Shipping

1.     On the computer or computers that you have identified as the destination system, click Start, click Programs, click Microsoft SQL Server 2005, and then click SQL Server Management Studio.
2.     In the Connect to Server dialog box, specify the name of the SQL Server on the destination computer, and then click Connect to connect to the appropriate SQL Server.
3.     In Microsoft SQL Server Management Studio, click File, click Open, and then click File.
4.     In the Open File dialog box, browse to the following SQL script:
%SystemRoot%\Program Files\Microsoft BizTalk Server 2006\Schema\LogShipping_Destination_Schema.sql
5.     Click the Query menu, and then click Execute.
The LogShipping_Destination_Schema drops and recreates the tables used for restoring the source databases on the destination system. This includes tables to store the list of databases being recovered, copies of the backup history imported from the source system's BizTalkMgmtDb database, and information about SQL Server Agent jobs configured to run against the source databases.
6.     In Microsoft SQL Server Management Studio, click File, click Open, and then click File.
7.     In the Open File dialog box, browse to the following SQL script:
%SystemRoot%\Program Files\Microsoft BizTalk Server 2006\Schema\LogShipping_Destination_Logic.sql
8.     Click the Query menu, and then click Execute.
9.     On the computer or computers you have identified as the destination system, click Start, click Programs, click Microsoft SQL Server 2005, and then click SQL Server Management Studio.
10.  In the Connect to Server dialog box, specify the name of the SQL Server on the destination computer, and then click Connect to connect to the appropriate SQL Server.
11.  In Microsoft SQL Server Management Studio, click New Query.
12.  In the query window paste the following command:
exec bts_ConfigureBizTalkLogShipping @nvcDescription = '<MyLogShippingSolution>',
@nvcMgmtDatabaseName = '<BizTalkServerManagementDatabaseName>',
@nvcMgmtServerName = '<BizTalkServerManagementDatabaseServer>',
@SourceServerName = null, -- null indicates that this destination server restores all databases
@fLinkServers = 1 -- 1 automatically links the server to the management database

13.  In the command, replace <MyLogShippingSolution> with a meaningful description, surrounded by single quotes. Replace <BizTalkServerManagementDatabaseName> and <BizTalkServerManagementDatabaseServer> with the name and location of your source BizTalk Management database, surrounded by single quotes.

Description: http://i.msdn.microsoft.com/Aa560961.Important(en-us,MSDN.10).gifImportant
Before you execute this statement, you must enable the Ad Hoc Distributed Queries configuration option on the destination system.
Description: http://i.msdn.microsoft.com/Aa560961.note(en-us,MSDN.10).gifNote
If you have more than one source server, you can restore each source server to its own destination server. On each destination server, in the @SourceServerName = null parameter, replace null with the name of the appropriate source server, surrounded by single quotes (for example, @SourceServerName = 'MySourceServer',).

14.  Click the Query menu, and then click Execute.
Description: http://i.msdn.microsoft.com/Aa560961.Important(en-us,MSDN.10).gifImportant
if the query fails, after you fix the problem with the query, you must start over from step 1 of this procedure to reconfigure the destination system.
Description: http://i.msdn.microsoft.com/Aa560961.note(en-us,MSDN.10).gifNote
The restore jobs on the destination system will attempt to recreate the log and data files for each restored database in the same location as they existed on the source database server.

15.  On the destination system, in SQL Server Management Studio, double-click the appropriate server, double-click SQL Server Agent, and then double-click Jobs.
16.  In the details pane, you will see three new jobs:
·         BTS Log Shipping Get Backup History
The BizTalk Server Log Shipping Get Backup History job moves backup history records from the source to the destination. It is scheduled by default to run every minute. This job runs as frequently as possible in order to move history records from the source to the destination. In the event of a system failure to the source system, the server that you identified as the destination system will continue to process the history records that have already been imported.
·         BTS Server Log Shipping Restore Databases
The BizTalk Server Log Shipping Restore Databases job restores backup files for the given databases for the source to the destination server. It is scheduled by default to run every minute. This job runs continuously without completing as long as there are backup files to restore. As an extra precaution, you can run this job an additional time to ensure that it is complete.
·         BTS Log Shipping Restore To Mark
The BizTalk Server Log Shipping Restore To Mark job restores all of the databases to a mark in the last log backup. This ensures that all of the databases are in a transactionally consistent state. In addition, this job re-creates all of the SQL Server Agent jobs on the destination system that had been on the source system.

Description: http://i.msdn.microsoft.com/Aa560961.Important(en-us,MSDN.10).gifImportant
You should monitor these jobs to ensure that they do not fail.

17.  On a computer running BizTalk Server 2006, browse to the following folder: %SystemRoot%\Program Files\Microsoft BizTalk Server 2006\Schema\Restore.

Description: http://i.msdn.microsoft.com/Aa560961.note(en-us,MSDN.10).gifNote
On 64-bit computers, browse to the following folder: %SystemRoot%\Program Files (x86)\Microsoft BizTalk Server 2006\Bins32\Schema\Restore.

18.  Right-click SampleUpdateInfo.xml, and then click Edit.
19.  Replace all instances of "SourceServer" with the name of the source system, and then replace all instances of "DestinationServer" with the name of the destination system.

Description: http://i.msdn.microsoft.com/Aa560961.Important(en-us,MSDN.10).gifImportant
Include the quotation marks around the name of the source and destination systems.
Description: http://i.msdn.microsoft.com/Aa560961.note(en-us,MSDN.10).gifNote
If you renamed any of the BizTalk Server databases, you must also update the database names as appropriate.
Description: http://i.msdn.microsoft.com/Aa560961.note(en-us,MSDN.10).gifNote
If you have configured BAM, you must add two more lines in OtherDatabases section of the SampleUpdateInfo.xml file for the BAMAlertsApplication and BAMAlertsNSMain databases. If you changed the default name for these two databases, please use the actual database names.
<Database Name="BAM Alerts Application DB" oldDBName="BAMAlertsApplication" oldDBServer="SourceServer" newDBName=" BAMAlertsApplication" newDBServer="DestinationServer"/>
<Database Name="BAM Alerts Instance DB" oldDBName="BAMAlertsNSMain" oldDBServer="SourceServer" newDBName="BAMAlertsNSMain" newDBServer="DestinationServer"/>

21.  If you have more than one MessageBox database in your BizTalk Server system, add another MessageBoxDB line to the list, and then set IsMaster="0" for the non-master databases.
22.  If you are using BAM, HWS, or the Rules Engine, EDI, uncomment these lines as appropriate.
23.  If you have any custom databases, add them as appropriate under the <OtherDatabases> section. For more information, see How to Back Up Custom Databases.
24.  When you are finished editing the file, save it and exit.

BizTalk : How To : Restore Your backup BizTalk Databases

$
0
0

How to Restore Your BizTalk Databases

1.     On the computer or computers that you have identified as the destination system, click Start, click Programs, click Microsoft SQL Server 2005, and then click SQL Server Management Studio.
2.     In the Connect to Server dialog box, specify the name of the SQL Server on the destination system, and then click Connect to connect to the appropriate SQL Server.
3.     In Microsoft SQL Server Management Studio, double-click the appropriate server, double-click SQL Server Agent, and then double-click Jobs.
4.     In the details pane, right-click BTS Log Shipping - Get Backup History, and then click Disable.
In the Disable Jobs dialog box, the status changes to Success.
5.     In the details pane, right-click BTS Log Shipping - Restore Databases, and then click Disable.
In the Disable Jobs dialog box, the status changes to Success.
6.     In the details pane, right-click BTS Log Shipping - Restore To Mark, and then click Start Job.
SQL Server Agent jobs and BizTalk Server databases are restored to the destination system.
7.     On the computer running BizTalk Server 2006, where you edited the SampleUpdateInfo.xml file, open a command prompt. Click Start, click Run, type cmd and then click OK.
8.     Navigate to the following directory: %SystemRoot%\Program Files\Microsoft BizTalk Server 2006\Schema\Restore.

Description: http://i.msdn.microsoft.com/Aa546753.note(en-us,MSDN.10).gifNote
On 64-bit computers, browse to the following folder: %SystemRoot%\Program Files (x86)\Microsoft BizTalk Server 2006\Bins32\Schema\Restore.

9.     At the command prompt, type:
cscript UpdateDatabase.vbs SampleUpdateInfo.xml
This script updates all tables that store information about the location of other databases.

Description: http://i.msdn.microsoft.com/Aa546753.note(en-us,MSDN.10).gifNote
You only need to run UpdateDatabase.vbs on one server in the BizTalk group.
Description: http://i.msdn.microsoft.com/Aa546753.note(en-us,MSDN.10).gifNote
On 64-bit computers, you must run UpdateDatabase.vbs from a 64-bit command prompt.

10.  Copy the edited SampleUpdateInfo.xml file to the %SystemRoot%\Program Files\Microsoft BizTalk Server 2006\Schema\Restore directory on every computer running BizTalk Server 2006 that is part of the BizTalk Server group.

Description: http://i.msdn.microsoft.com/Aa546753.note(en-us,MSDN.10).gifNote
On 64-bit computers, browse to the following folder: %SystemRoot%\Program Files (x86)\Microsoft BizTalk Server 2006\Bins32\Schema\Restore.

11.  On each computer in the BizTalk Server group, open a command prompt. Click Start, click Run, type cmd and then click OK.

12.  Navigate to the following directory: %SystemRoot%\Program Files\Microsoft BizTalk Server 2006\Schema\Restore.

Description: http://i.msdn.microsoft.com/Aa546753.note(en-us,MSDN.10).gifNote
On 64-bit computers, browse to the following folder: %SystemRoot%\Program Files (x86)\Microsoft BizTalk Server 2006\Bins32\Schema\Restore.

13.  At the command prompt, type:
cscript UpdateRegistry.vbs SampleUpdateInfo.xml
This script updates all registry entries that store information about the location of other databases.

Description: http://i.msdn.microsoft.com/Aa546753.note(en-us,MSDN.10).gifNote
You need to run UpdateRegistry.vbs on every server in the BizTalk group.
Description: http://i.msdn.microsoft.com/Aa546753.note(en-us,MSDN.10).gifNote
On 64-bit computers, you must run UpdateRegistry.vbs from a 64-bit command prompt.

14.  Restart all of the BizTalk Server services. For more information about how to restart the BizTalk Server services, see How to Start, Stop, Pause, Resume, or Restart BizTalk Server Services.

15.  After restoring your databases, you must restart the Windows Management Instrumentation service. Click Start, click Run, type services.msc, and then click OK. Right-click Windows Management Instrumentation, and then click Restart.
16.  On the computer you use to administer BizTalk Server, click Start, click Programs, click Microsoft BizTalk Server 2006, and then click BizTalk Server Administration.
17.  In the console tree, right-click the BizTalk Group, and then click Remove.
18.  In the console tree, right-click BizTalk Server 2006 Administration, and then click Connect to Existing Group.
19.  In the Connect to Existing BizTalk Server Configuration Database dialog box, in the SQL Server name drop-down list box, select the name of the Microsoft SQL Server instance that hosts the BizTalk Management database. When you select the instance of SQL Server, BizTalk Server automatically attempts to detect BizTalk Server databases on that computer.
20.  In the Database name drop-down list box, select the BizTalk Management database (BizTalkMgmtDb) to which you want to connect, and then click OK.
The BizTalk Server Administration Console adds the BizTalk group to the console tree.
Your BizTalk server is now restored and should be running. You should now configure the Backup BizTalk Server job to start writing backups to a new destination server. You should also reconfigure a new destination system.

Description: http://i.msdn.microsoft.com/Aa546753.Important(en-us,MSDN.10).gifImportant
If you are using the Rules Engine, after restoring the databases, you must restart the Rule Engine Update Service on every server in the BizTalk Server group. For more information about how to restart the Rule Engine Update Service, see How to Start, Stop, Pause, Resume, or Restart BizTalk Server Services.

Description: http://i.msdn.microsoft.com/Aa546753.note(en-us,MSDN.10).gifNote
If you are using BAS or BAM, this is the time to restore the BAS and BAM databases. For more information, see Backing Up and Restoring BAS and Backing Up and Restoring BAM.

BizTalk : How To : Backup BAM Databases and Update References to BAM Databases

$
0
0
The following tables describe the databases used by BizTalk Server and identify which methods are used to back up the databases.

Databases Backed Up by the Backup BizTalk Server Job

The following table lists the databases that are backed up and restored as a part of the Backup BizTalk Server job. You can modify the Backup BizTalk Server job to back up custom databases by adding them to the adm_OtherBackupDatabases table.

Database
Default database name
Description
BAM Primary Import database
BAMPrimaryImport
This is the database where the Business Activity Monitoring (BAM) collects raw tracking data.
BAM Notification Services Application database
BAMAlertsApplication
This database contains alert information for BAM notifications. For example, when you create an alert using the BAM portal, entries are inserted in the database specifying the conditions and events to which the alert pertains, as well as other supporting data items for the alert.
BAM Notification Services Instance database
BAMAlertsNSMain
This database contains instance information specifying how the notification services connect to the system that BAM is monitoring.
HWS Administration database
BizTalkHwsDb
This database contains all administration information related to Human Workflow Services (HWS).
BizTalk Tracking database
BizTalkDTADb
This database stores health monitoring data tracked by the BizTalk Server tracking engine.
BizTalk Management database
BizTalkMgmtDb
This database is the central meta-information store for all instances of BizTalk Server.
BizTalk MessageBox database
BizTalkMsgBoxDb
This database is used by the BizTalk Server engine for routing, queuing, instance management, and a variety of other tasks.
Rule Engine database
BizTalkRuleEngineDb
This database is a repository for:
·         Policies, which are sets of related rules.
·         Vocabularies, which are collections of user-friendly, domain-specific names for data references in rules.
SSO database
SSODB
This Enterprise Single Sign-On database securely stores the configuration information for receive locations.
TPM database
TPM
This database stores trading partner data for Business Activity Services (BAS). By default, TPM database is combined with BizTalk Management (BizTalkMgmtDb) database.
BizTalk Base EDI database
BizTalkEDIdb
This database stores state for the Base electronic data interchange (EDI) adapter, which has been deprecated in BizTalk Server 2006 R2. The Base EDI adapter can be used in upgrade scenarios, but for new installations of BizTalk Server 2006 R2, use the native EDI and AS2 functionality.

Databases Backed Up by the BAS Backup Process

The following table lists the Microsoft Windows SharePoint Services databases that are backed up and restored using the procedures in Backing Up and Restoring BAS:

Database
Default database name
Description
Windows SharePoint Services configuration database
User-defined
This database contains all of the global settings for the server.
Windows SharePoint Services content database
User-defined
This database contains all of the site content, such as list items and documents.

Databases Backed Up by the BAM Backup Process

The following table lists the databases that are backed up and restored using the procedures in Backing Up and Restoring BAM:

Database
Default database name
Description
BAM Star Schema
BAMStarSchema
This database contains the staging table, and the measure and dimension tables.
BAM Analysis
BAMAnalysis
This database contains BAM OLAP cubes for both online and offline analysis.
BAM Archive
BAMArchive
This database archives old business activity data. Create a BAM Archive database to minimize the accumulation of business activity data in the BAM Primary Import database.
Tracking Analysis Server
BizTalkAnalysisDb
This database stores health monitoring online analytical processing (OLAP) cubes.

How to Back Up the BAM Analysis and Tracking Analysis Server Databases

The Business Activity Monitoring (BAM) Analysis database and the Tracking Analysis Server database store content in SQL Server Analysis Services cubes. The Backup BizTalk Server job does not back up these databases. Instead, to backup these databases, you must use SQL Server Analysis Manager.
After you back up these databases, you may want to purge the OLAP cubes. When you purge the OLAP cubes, you must also perform the following steps:
1.     Before you purge the OLAP cubes, in the BAM Star Schema database, truncate the fact table(s) for the cube you want to purge. The table naming convention is "bam_<CubeName>_Facts".
2.     After you purge the OLAP cubes, you must fully process active, completed, and virtual cubes.
For instructions about backing up the analysis databases, see "Archiving an Analysis Services Database" in SQL Server Books Online.

Scheduling backups for the BAM databases

If you are using BAM, verify that neither the BAM cube process nor data maintenance Data Transformation Services (DTS) packages are running when the backup package is scheduled to run.
To ensure consistent schema across all BAM databases, back up the BAM databases and DTS packages each time you deploy or undeploy a BAM activity.
Back up the BAM Analysis database and BAM Star Schema database each time you deploy or undeploy a BAM view.
Back up the BAM databases in the following order:
1.     Run the Backup BizTalk Server job to back up the BAM Primary Import database and your other BizTalk Server databases.
2.     Run the BAM data maintenance DTS package for all activities.
Incorporate these steps into a DTS package, and schedule the package to run on a regular basis. To ensure data integrity, make sure no other BAM cubing or data maintenance DTS packages run when this backup package is scheduled to run.
To ensure that you can recover a complete set of archived data if the BAM Archive database fails, back up the BAM Archive database after you copy the partition into the BAM Archive database, but before you delete the partition from the BAM Primary Import database. To do this, modify the data maintenance DTS package for each activity to insert a step to back up the BAM Archive database before the last step in the DTS package, "End Archiving."
3.     Back up the BAM Analysis database, and then the BAM Star Schema database.

How to Update References to the BAM Analysis Server Database Name

1.     Stop any BAM cube update and data maintenance SSIS packages, or prevent them from running until you have restored the BAM Analysis database.
2.     Stop the BizTalk Application service (which includes the BAM Event Bus service) so it does not try to import more data into the database.
1.     Click Start, click Run, and then type services.msc.
2.     Right-click the BizTalk Service BizTalk Group: BizTalkServerApplication service and then click Stop.
3.     Click Start, click Microsoft SQL Server 2005, and then click SQL Server Business Intelligence Development Studio.
4.     In SQL Server Business Intelligence Development Studio, create a new project. Click File, click New, and then click Project.
5.     In the New Project dialog box, in Templates, click Integration Services Project, and then click OK.
6.     In the Integration Services Project dialog box, in Solution Explorer, right-click SSIS Packages, and then click Add Existing Package.
7.     In the Add Copy of Existing Package dialog box, in the Server drop-down list box, select the server that contains the BAM_AN package.
8.     In Package Path, click the ellipses button.
9.     In the SSIS Package dialog box, select the BAM_AN package, click OK, and then click OK.
The package is now listed in Solution Explorer.
10.  In Solution Explorer, double-click the BAM_AN package. In Connection Managers, double-click database number 3 (MSDB database).
11.  In the Connection Manager dialog box, in the Server name box, enter the name of the MSDB server, and then click OK.
12.  Click the Package Explorer tab, double-click the Variables folder, and then update the values for the primary import server name and primary import database name.
13.  Click File, and then click Save All.
14.  In Microsoft SQL Server Management Studio, click Connect.
15.  Click Integration Services, double-click Stored Packages, click MSDB, right-click the BAM_AN package, and then click Import Package.
16.  In the Import Package dialog box, in Package location, select File System.
17.  In Package Path, navigate to your saved project, select the BAM_AN*.dtsx file, and then click Open.
18.  Click inside the Package Name box to automatically populate the box.
19.  Click OK, and then click Yes to overwrite.
20.  Restart the BizTalk Application service.
1.     Click Start, click Run, and then type services.msc.
2.     Right-click the BizTalk Service BizTalk Group: BizTalkServerApplication service and then click Start.
21.  Enable any BAM cube update and data maintenance SSIS packages.

How to Update References to the BAM Star Schema Database Name

1.     Stop any BAM cube update and data maintenance SSIS packages, or prevent them from running until you have restored the BAM Star Schema database.
2.     Stop the BizTalk Application service (which includes the BAM Event Bus service) so it does not try to import more data into the database.
1.     Click Start, click Run, and then type services.msc.
2.     Right-click the BizTalk Service BizTalk Group: BizTalkServerApplication service and then click Stop.
3.     Click Start, click Programs, click Microsoft SQL Server 2005, and then click SQL Server Business Intelligence Development Studio.
4.     In SQL Server Business Intelligence Development Studio, create a new project. Click File, click New, and then click Project.
5.     In the New Project dialog box, in Templates, click Integration Services Project, and then click OK.
6.     In the Integration Services Project dialog box, in Solution Explorer, right-click SSIS Packages, and then click Add Existing Package.
7.     In the Add Copy of Existing Package dialog box, in the Server drop-down list box, select the server that contains the BAM_AN package.
8.     In Package Path, click the ellipses button.
9.     In the SSIS Package dialog box, select the BAM_AN package, click OK, and then click OK.
The package is now listed in Solution Explorer.
10.  In Solution Explorer, double-click the BAM_AN package. In Connection Managers, double-click database number 3 (MSDB database).
11.  In the Connection Manager dialog box, in the Server name box, enter the name of the MSDB server, and then click OK.
12.  Click the Package Explorer tab, double-click the Variables folder, and then update the values for the primary import server name and primary import database name.
13.  Click File, and then click Save All.
14.  In Microsoft SQL Server Management Studio, click Connect.
15.  Click Integration Services, double-click Stored Packages, click MSDB, right-click the BAM_AN package, and then click Import Package.
16.  In the Import Package dialog box, in Package location, select File System.
17.  In Package Path, navigate to your saved project, select the BAM_AN*.dtsx file, and then click Open.
18.  Click inside the Package Name box to automatically populate the box.
19.  Click OK, and then click Yes to overwrite.
20.  Restart the BizTalk Application service.
1.     Click Start, click Run, and then type services.msc.
2.     Right-click the BizTalk Service BizTalk Group: BizTalkServerApplication service and then click Start.
21.  Enable any BAM cube update and data maintenance SSIS packages.

How to Update References to the BAM Archive Database Name

1.     Stop any BAM cube update and data maintenance DTS packages, or prevent them from running until you have restored the BAM Archive database.
2.     Stop the BizTalk Application service (which includes the BAM Event Bus service) so it does not try to import more data into the database.
1.     Click Start, click Run, and then type services.msc.
2.     Right-click the BizTalk Service BizTalk Group: BizTalkServerApplication service and then click Stop.
3.     Click Start, click Programs, click Microsoft SQL Server 2005, and then click SQL Server Business Intelligence Development Studio.
4.     In SQL Server Business Intelligence Development Studio, create a new project. Click File, click New, and then click Project.
5.     In the New Project dialog box, in Templates, click Integration Services Project, and then click OK.
6.     In the Integration Services Project dialog box, in Solution Explorer, right-click SSIS Packages, and then click Add Existing Package.
7.     In the Add Copy of Existing Package dialog box, in the Server drop-down list box, select the server that contains the BAM_DM package.
8.     In Package Path, click the ellipses button.
9.     In the SSIS Package dialog box, select the BAM_DM package, click OK, and then click OK.
The package is now listed in Solution Explorer.
10.  In Solution Explorer, double-click the BAM_DM package. In Connection Managers, double-click database number 3 (MSDB database).
11.  In the Connection Manager dialog box, in the Server name box, enter the name of the MSDB server, and then click OK.
12.  Click the Package Explorer tab, double-click the Variables folder, and then update the values for the primary import server name and primary import database name.
13.  Click File, and then click Save All.
14.  In Microsoft SQL Server Management Studio, click Connect.
15.  Click Integration Services, double-click Stored Packages, click MSDB, right-click the BAM_DM package, and then click Import Package.
16.  In the Import Package dialog box, in Package location, select File System.
17.  In Package Path, navigate to your saved project, select the BAM_DM*.dtsx file, and then click Open.
18.  Click inside the Package Name box to automatically populate the box.
19.  Click OK, and then click Yes to overwrite.
20.  Restart the BizTalk Application service.
1.     Click Start, click Run, and then type services.msc.
2.     Right-click the BizTalk Service BizTalk Group: BizTalkServerApplication service and then click Start.
21.  Enable any BAM cube update and data maintenance SSIS packages.

How to Update References to the BAM Primary Import Database Name and Connection String

1.     Stop any BAM cube update and data maintenance Data Transformation Services (DTS) packages, or prevent them from running until you have restored the BAM Primary Import database.
2.     Stop the BizTalk Application service (which includes the BAM Event Bus service) so it does not try to import more data into the database.
1.     Click Start, click Run, and then type services.msc.
2.     Right-click the BizTalk Service BizTalk Group: BizTalkServerApplication service and then click Stop.
3.     Restore the BAM Primary Import database, performing the steps in How to Restore Your Databases.
4.     Update the following Web.Config files:
·         C:\Program Files\Microsoft BizTalk Server 2006\BAMPortal\BamManagementService\Web.Config.
Replace the <ServerName> string with the new server name and <DatabaseName> with the new database name. Update the following connection strings:
<appSettings>
<add key="BamServer" value="<ServerName>" />
<add key="BamDatabase" value="<DatabaseName>" />
<add key="MaxResultRows" value="2000" />
</appSettings>
·         C:\Program Files\Microsoft BizTalk Server 2006\BAMPortal\BamQueryService\Web.Config.
Replace the <ServerName> string with the new server name and <DatabaseName> with the new database name. Update the following connection strings:
<appSettings>
<add key="BamServer" value="<ServerName>" />
<add key="BamDatabase" value="<DatabaseName>" />
<add key="MaxResultRows" value="2000" />
</appSettings>

5.     Click Start, click Run, type cmd and then click OK.
6.     Navigate to the following directory: %SystemRoot%\Program Files\Microsoft BizTalk Server 2006\Schema\Restore.
7.     Right-click SampleUpdateInfo.xml, and then click Edit.
0.     Comment out all of the database sections except for the BizTalkMgmtDb, OldPrimaryImportDatabase, PrimaryImportDatabase, ArchivingDatabase, AnalysisDatabase, StarSchemaDatabase, and Alert.
1.     For the BizTalkMgmtDb, OldPrimaryImportDatabase, PrimaryImportDatabase, ArchivingDatabase, AnalysisDatabase, StarSchemaDatabase, and Alert sections, set the "SourceServer" and "Destination Server" to the name of the existing server where those databases reside.
2.     For PrimaryImportDatabase, set the "SourceServer" to the name of the server where you have moved the BAM Primary Import database.

Description: http://i.msdn.microsoft.com/Aa561586.Important(en-us,MSDN.10).gifImportant
Include the quotation marks around the name of the source and destination systems.
Description: http://i.msdn.microsoft.com/Aa561586.note(en-us,MSDN.10).gifNote
If you renamed any of the BizTalk Server databases, you must also update the database names as appropriate.

3.     When you are finished editing the file, save it and exit.
8.     At the command prompt, type:
cscript UpdateDatabase.vbs SampleUpdateInfo.xml

Description: http://i.msdn.microsoft.com/Aa561586.note(en-us,MSDN.10).gifNote
You only need to run UpdateDatabase.vbs once.
Description: http://i.msdn.microsoft.com/Aa561586.note(en-us,MSDN.10).gifNote
On 64-bit computers, you must run UpdateDatabase.vbs from a 64-bit command prompt.


9.     At the command prompt, navigate to the following directory:
%SystemRoot%\Program Files\Microsoft BizTalk Server 2006\Tracking
10.  At the command prompt, edit bm.exe.config, change the value of key="DefaultServer" to the new server name, and then save the file.
11.  Update the reference to BAM Primary Import Database in all BAM Livedata Microsoft Excel files. For each file:
0.     Open the Excel live data file. The file name ends with _LiveData.xls.
1.     On the BAM menu, click BAM DB Connection.
2.     In the Select BAM Database dialog box, enter the SQL Server and BAMPrimaryImport database, and then click OK.
3.     On the File menu, click Close and Return to Microsoft Excel.
4.     On the File menu, click Save.
12.  Restart the BizTalk Application service.
0.     Click Start, click Run, and then type services.msc.
1.     Right-click the BizTalk Service BizTalk Group: BizTalkServerApplication service and then click Start.
13.  Enable any BAM cube update and data maintenance DTS packages.
14.  To resolve any incomplete trace instances, see How to Resolve Incomplete Activity Instances.

How to Update References to the BAM Notification Services Databases

1.     Click Start, click Run, type cmd, and then click OK.
2.     At the command prompt, navigate to the following directory: %SystemRoot%\Program Files\Microsoft BizTalk Server 2006\Tracking.
3.     Type: bm.exe get-config –filename:config.xml
4.     Open the xml file created in step 2 to obtain the list of the computers on which you must re-register Notification Services.
The computer names are listed in the <Property Name=> parameters in the <DeploymentUnit Name="Alert"> section of the xml file:
        <DeploymentUnit Name="Alert">
               <Property Name="GeneratorServerName" />
               <Property Name="ProviderServerName" />
               <Property Name="DistributorServerName" />
  </DeploymentUnit>
5.     On each computer listed in the xml file, stop the NS service and then unregister an instance of Notification Services:
1.     Click Start, click Programs, click Microsoft SQL Server 2005, click Configuration Tools, and then click Notification Services Command Prompt.
2.     At the command prompt, type: net stop NS$BamAlerts
3.     Type the following command to unregister the instance:
nscontrol unregister -name BamAlerts
Unregistering an instance removes the registry entries, removes the NS$instance_name service (if present), and deletes the performance counters for the service.
6.     Re-register the Notification Service:
1.     Click Start, click Programs, click Microsoft SQL Server 2005, click Configuration Tools, and then click Notification Services Command Prompt.
2.     At the command prompt, type: nscontrol register -name BamAlerts -server <ServerName> -service -serviceusername "<ServiceUserName>" -servicepassword "<ServicePassword>"
This enables Notification Services to log on to the correct database (this information is maintained in the registry of the service machine by nscontrol).

Description: http://i.msdn.microsoft.com/Aa578110.Important(en-us,MSDN.10).gifImportant
Remember to use the new Notification Services databases server in the -server option when re-registering the service. In addition, you should use the same user name for the new Notification Services service as the old one.

7.     On the computer that hosts the BAM portal, click Start, click Programs, click Microsoft SQL Server 2005, click Configuration Tools, and then click Notification Services Command Prompt.
8.     At the command prompt, type:
net stop NS$BamAlerts
9.     At the command prompt, type:
nscontrol unregister -name BamAlerts
10.  At the command prompt, type:
nscontrol register -name <BamAlerts> -server<NotificationServicesDatabaseServer>
11.  At the command prompt, type: net start NS$BamAlerts.
12.  Click Start, click Run, type cmd, and then click OK.
13.  At the command prompt, navigate to the following directory: %SystemRoot%\Program Files\Microsoft BizTalk Server 2006\Tracking.
14.  At the command prompt, type:
bm.exe update-config –FileName:config.xml

How to Resolve Incomplete Activity Instances

1.     Run the following query against the BAM Primary Import database:
Select ActivityID from bam_<ActivityName>_Active where IsComplete = 0
2.     If data from external systems indicates that the activity instance is in fact completed, run the following query to manually complete the instance:
exec bam_<ActivityName>_PrimaryImport @ActivityID=N'<ActivityID>', @IsStartNew=0, @IsComplete=1

Description: http://i.msdn.microsoft.com/Aa561272.note(en-us,MSDN.10).gifNote
You can follow the same process to complete a continuation activity by replacing ActivityID with ContinuationID.


Description: http://i.msdn.microsoft.com/Aa561272.note(en-us,MSDN.10).gifNote
If the main trace has any active continuation traces, it remains active until the continuation traces are completed.

BizTalk : How To : Issues

$
0
0

post by sander nef

Issue: Outputfile name is %sourcefilename%

Is it, that…? You have promoted the FILE.ReceivedFileName and configured the macro %SourceFileName%, however, this is CASE SENSITIVE!
Issue: No processing takes place after a BRE call

Is it, that…? You might be using a .Net helperclass, you’ve added the ‘StaticSupport’ following (http://msdn.microsoft.com/en-us/library/dd298814(v=bts.10).aspx). This won’t work…the StaticSupport should be created under the WOW64Node
Issue: Pipeline configuration change does not have any effect

Is it, that…? You are using a dynamic send port…if so, stop/start the application-port
Issue: Inside my orchestration, a variable assignments (from context properties) leads to an exception (missing property exception)

Is it, that…? You are not assigning the variable from the message property in the very beginning of the orchestration, you are doing this when you need the variable as you would do in normal code….if possible, make sure that you minimize the number of shapes between receive and message context properties retrievals.
Issue: You are using the Date functoid to generate a date, you want to use a different format (From the functoid: The output format is CCYY-MM-DDThh:mm:ss.)

Is it, that…? You are using a ConvertDate functoid from a library that requires an input format, the description from the Date functoid does not work..
This is because the description is not correct and should be as defined in Input[1]

clip_image002
In my case I used a functoid library which has a parseExact call;
clip_image002[4]
Issue: I’m migrating a solution that contains a service reference and want to update this reference with a new URL / or use a classic ASP.Net webservice
Is it, that…? You forgot that little trick, which allows you to create/update the reference for classic 2.0 references Glimlach
clip_image002[6]
Click Advanced
clip_image004

Click ‘Add Reference’

clip_image006

Enter the address

clip_image007

Issue: Debugging XSLT raises an error
Is it, that…? You are calling a custom functoid / .Net class in the map…you won’t be able to debug

Issue: Calling an functoid / .Net class in an XSLT map does not work
Is it, that…? Only when you have an external XSLT it is possible to call a functoid / .Net class from the XSLT

Issue: There is no tracking data
Is it, that…? There are multiple tracking hosts

Run .bat and .ps cmd files from Visual Studio 2010 2008

$
0
0
post by Rick Glos:

Visual Studio 2010 | 2012

You can use this technique to run windows command files with the .bat and .cmd extensions.
Just as previously, we need to create at least one, and optionally two, external tools.
One that terminates the window after executing.
Here’s the values for you to copy+paste and screenshot.
FieldValue
TitleRun With Cmd
Command%ComSpec%
Arguments/C $(ItemPath)
Initial Directory$(ItemDir)
screenshot
One that leaves the command window open after executing.  Useful if you didn’t put a ‘pause’ in your command file or if you want to leave the cmd window open for additional commands.
FieldValue
TitleRun With Cmd and Remain
Command%ComSpec%
Arguments/K $(ItemPath)
Initial Directory$(ItemDir)
screenshot
Now we should see our new external tools available on the Tools menu.
image
However, we’d like to right-click on the file and run the cmd file via Solution Explorer like so:
image
Customizing this context menu in Visual Studio 2010 is abit different from context menu customization in VS2005/2008.
Click Tools –> Customize… to launch the Customize Dialog.
From that dialog we want to select the ‘Context menu’ radio option and the ‘Project and Solution Context Menus | Item’ from the drop down.  I’m going to put the two commands right under ‘Open With…’.  You can certainly do whatever you wish.  Start this process by clicking ‘Add Command’ button on the same dialog.
So here’s a screenshot with that above paragraph in a picture instead of words:
image
When we click ‘Add Command’, the Add Command Dialog will open.  Select ‘Tools’ from the Catgories list box on the left and find your external command from the command list box on the right.  Your command will be named something like ‘External Command {Number}’ where {Number} is the number in your list from your External Tools dialog.
image
Clear as mud?  I’m going to use this to make sure I add External Command 3 and External Command 4 to the context menu.
image
Now the ‘Project and Solution Context Menus | Item’ context menu should look like this in the Customize Dialog.
image 
Close that dialog and check out your new menu items by right clicking on a file in Solution explorer.  You should see your new external commands.
image
For extra credit, you can go back into the Customize dialog and move your commands around into spot your like and alos create a Group around them.
image

The finished product looks like this.
image

Visual Studio 2005 | 2008

his will take you a few minutes to setup but once your done, it will save you countless minutes.
It's not unusual to have scripts in your project or solution that automate tasks.  Everything from executing a powershell script, moving files around, or some other custom automation tool you may have written.
The default for double-clicking a cmd file in Visual Studio is for it to open the script for editing.
image
But what if you want to execute it?
One way is to right click the folder above the file, choose 'Open Folder in Windows Explorer', wait for that window to open, find the file with your eyes again, and double-click to execute it.
I tried using the 'Open With...' menu item and adding cmd but it doesn't allow you to pass in the file.
image
So what you end up with is an empty cmd prompt window that hasn't executed the script you thought it would.
Ok great so how did you do it?
On the tools menu you can add external tools and add arguments.  So Tools -> External Tools and a window will open that allows you to run with cmd and also pass in the initial directory as well as some additional arguments.
I created two:
One that terminates the window after executing
TitleRun With Cmd
CommandC:\Windows\System32\cmd.exe
Arguments/C $(ItemPath)
Initial directory$(ItemDir)
image
One that remains after executing
TitleRun With Cmd and Remain
CommandC:\Windows\System32\cmd.exe
Arguments/K $(ItemPath)
Initial directory$(ItemDir)
image
So now you can select the file in solution explorer, then select Tools -> Run With Cmd.
You could go one step further and add it to the context menu.
There's many ways to get into menu customize mode, one way is to choose View -> Toolbars -> Customize.  Make sure to select the 'Context Menus' toolbar and you'll notice a toolbar appear in your menu when you're in customize mode.
image
This next part is tricky.  Leave the customize dialog open - it's semi model, if you close it, you're out of edit mode.  Click Tools -> and you'll see you're new command listed something like 'External Command 3', you'll have to remember which ones you created (or yes you could go and customize that text as well).
Hold down control and left click (we want to copy this to the context menu not move it), slide your pointer over the 'Project and Solution Context Menus' menu item in the context menu toolbar, then down to 'Item', and drop it in there wherever you like.
image
Close the customize dialog.
Now you can right-click on a cmd file in Solution Explorer and select either 'Run With Cmd' or 'Run With Cmd and Remain'.
image

Biz Talk : How To : Throw Custom Exception in Map

$
0
0
post by Brett

I have run into an instance where I need to terminate and raise an exception from within an XSLT template, based on values (or lack thereof) within the source document.  The XSLT transform is running within a BizTalk map.

The secret is the following little-known XSLT construct, which can be conditionally called at any point in the transform:

<xsl:message terminate="yes">Custom error text</xsl:message>
This will cause the XSLT engine to stop processing immediately, and raise an exception.   This exception, including the custom error text contained within the message segment, can be caught in the BizTalk Orchestration engine by explicitly catching an exception of type 

Microsoft.XLANGS.BaseTypes.TransformationFailureException.

Fix Huge Maps in BizTalk - change default behavior - Undocumented Fix

$
0
0
post by Brett
I have been working with several industry standard Xml schema definitions, specifically those defined by the UBL standard by OASIS (www.oasis-open.org).  This organisation has a worthwhile, yet lofty, goal of defining a set of document standards that will cover the majority of communication needs for B2B.
The result of trying to be all things to all men is that the schemas defined are big.  Like really, REALLY big, with a set of included schema file that run about 8-10 deep.
The problem with this, in the BizTalk world, is when you either generate an instance document from the schema, or attempt to map a document to a UBL schema document using the BizTalk Mapper.  Due to the way the BizTalk handles default nodes, you end up with all default values being output into the destination document.
A quick, undocumented fix for this is to change the GenerateDefaultFixedNodes setting in the BizTalk Map.  Where is this setting, you ask?
Open the .btm file using the “XML Editor”, rather than the default “BizTalk Mapper” (i.e. right-click, choose “Open With…”, then XML Editor).  The root node of the map document is called “mapsource”, one of the attributes is called “GenerateDefaultFixedNodes”.  Change this from “Yes” to “No”, save and close, and you’re done.
This undocumented trick brought one of our generated XSLT transforms down from a slightly ridiculous 50 Mb to an easily handled 11 Kb, and the transform execution time from 20 seconds down to about the 50 millisecond mark (on a virtual machine)

Use Fiddler with BizTalk to monitor Incoming/Outgoing Traffic

$
0
0

Using Fiddler to debug BizTalk messages?

When using HTTP, SOAP or WCF send ports it can be incredibly useful to view the content of messages that are sent on the wire. This allows you to inspect the headers (SOAP or HTTP). Fiddler is a simple but fantastic tool to allow you to do this.

By default, Fiddler will not trace any messages sent to endpoints by BizTalk as it does not use WinInet. However, BizTalk send ports can be configured to use a proxy allowing Fiddler to intercept them. On the Send Port tick the Use Proxy checkbox and set the Server to 127.0.0.1 and the port to 8888. For dynamic ports, set the following properties (as applicable to the adapter being used)

// Debug via fiddler
msgSendRequest(SOAP.UseProxy) = true;
msgSendRequest(SOAP.ProxyAddress) = "127.0.0.1";
msgSendRequest(SOAP.ProxyPort) = 8888;


Note that this needs to be removed when Fiddler is not running since traffic directed to the proxy will not be received by anything.

Microsoft Integration Toolkit Overhaul 2013 - An Over Look

$
0
0
We all know that there has been a significant overhaul of Integration Stack to say most of the Microsoft Stack has been refreshed with new updated technologies releases and many new releases during TechEd 2013 and Build Conference 2013

Check out videos by BizTalk Gurus some very interesting demos and walkthroughs

Here is an Overlook of the Integration platform and changes that have been released lately

There is an Interesting post by  Saravana Kumar 

Understanding the current Integration Technologies Puzzle


and video link for the presentation Here

Article 1

$
0
0
post by scott

Had an interesting, yet all too common situation last week whilst looking to tune an integration solution built on BizTalk Server. The LOB system we were integrating with had used SQL Server as it’s backend as was performing poorly…real poorly. We were seeing up to 15 sec to grab a single customer from the database!
Upon looking at the DB schema I found all the tables defined something like this:
promoted_columns
With just an internal ID as the PK and a single column to store segments of xml data. What made this design “interesting” was the lack of any indexing on the DB. Capturing the queries being issued from the LOB system we had something like:
SELECT *
FROM [dbo].[Customers]
WHERE XmlData.exist
(' declare namespace ns0="http://BizTalkService.Customer"; /ns0:Customer[CustomerID=' declare namespace ns0="http://BizTalkService.Customer"; /ns0:Customer[CustomerID=''F001998A-E367-4B34-B630-3A70A91CA0BD''] ' ') = 1
SQL Server parse and compile time:
CPU time = 0 ms, elapsed time = 16 ms.
(1 row(s) affected)
Table'Customers'. Scan count 1, logical reads 33459, physical reads 0, read-ahead reads 0, lob logical reads 0, lob physical reads 0, lob read-ahead reads 0.
SQL Server Execution Times:
CPU time = 4914 ms, elapsed time = 4981 ms.
CREATEFUNCTION udf_Get_CustomerID(@xmldata XML)
RETURNS nvarchar(50)
WITH SCHEMABINDING
BEGIN
RETURN @xmldata.value
(
'declare namespace ns0="http://BizTalkService.Customer"; (/ns0:Customer/CustomerID)[1]'
(/ns0:Customer/CustomerID)[1]',
'nvarchar(50)'
)
END
GO
ALTERTABLE Customers
ADD CustomerID AS dbo.udf_Get_CustomerID(XmlData) PERSISTED
GO
CREATEINDEX ix_CustomerID ON Customers(CustomerID);
GO
SELECT *
FROM [dbo].[Customers]
WHERE CustomerID='F001998A-E367-4B34-B630-3A70A91CA0BD';
SQL Server parse and compile time:
CPU time = 0 ms, elapsed time = 4 ms.
(1 row(s) affected)
Table'Customers'. Scan count 1, logical reads 6, physical reads 0, read-ahead reads 0, lob logical reads 0, lob physical reads 0, lob read-ahead reads 0.
SQL Server Execution Times:
CPU time = 15 ms, elapsed time = 1 ms.
Of course not all scenarios can rely on the client app changing its behaviour and issuing an optimised query once it see’s proper indexing. If this describes your situation you maybe interested in Selective Xml Indexes. In this article Seth Delconte writes about the new SQL Server 2012 SP1 feature that doesn't require the client to change. 
These were taking anywhere from 1 sec up to 15 seconds. The execution plan was confirming what I’m sure you are already thinking: table scans! Simulating this query against our Customers table above with 100K rows gave us a baseline of around 5 sec to extract a single row.
Instead of xml indexing, which brings substantial storage and maintenance overhead, promoted columns were looked at. We were told by the LOB vendor that the client application optimised the queries if it found indexes defined on the table. Indexed columns would be used instead of xpath queries when they existed. But how do we get indexed columns from the table structure we had?
Here is the gist of the approach:
First, Identify the common xpath expressions being used which look appropriate to optimise. In our example this might be the CustomerID lookup. Then we create a UDF to grab this value from the xml segment stored in the row. A computed or promoted column is created using the PERSISTED keyword and an index created.
Now we can modify our query, as the LOB client did, to use the new indexed column and dramatically increase he performance of the types of queries.
Giving us stats of:
So we went from 4981 ms to 1 ms!
Obviously we need to consider the overhead this creates for write operations as we should when considering any indexing design. Only optimise the most costly queries that get issued most frequently. Overkill can lead to poorer performance as more resources are required to maintain the indexes. During our subsequent testing we didn't measure any noticeable impact. Further testing will quantify this for us in the coming weeks.

Publish WCF Service Endpoint to Azure Service Bus Relay | BizTalk 2013 / 2010

$
0
0
This post will focus on a feature that is technically present in BizTalk Server 2010, but was not installed by default. This feature was a subtle enhancement to the BizTalk WCF Service Publishing Wizard – namely the ability to publish a Windows Azure Service Bus Relay Endpoint without leaving the wizard (and also without using one of the new adapters that has Relay in its title).
Even if you didn’t know that this feature existed, you will find it the first time that you attempt to publish any BizTalk artifact (schema/orchestration) as a WCF service in BizTalk Server 2013. It takes the form of the following screen within the BizTalk WCF Service Publishing Wizard, which appears immediately after choosing to publish a service (rather than simply a metadata description):
publish_sbendpoint
If you check this box and proceed through the wizard (regardless of adapter selected on the first screen), you will see the following screen at the end of the typical wizard:
publish_sbendpoint_part2
The wizard assumes that you have already gone to the Windows Azure Management Portal and created a Service Bus namespace (effectively reserving yourself a sub-domain of servicebus.windows.net, and setting up an access control namespace for claims resolution and authorization purposes). If you’ve never done that before, it can be done through the New menu as shown below:
servicebus_namespace
The next page of the wizard will require information necessary for BizTalk to authenticate with Windows Azure and prove that it is indeed the destination endpoint for the relay. This information is also obtainable only from the Windows Azure Management Portal. In order to access this information, you will need to click on your newly created namespace in the list of Service Bus namespaces, and then click theConnection Information button at the bottom of the page:
connection_info_button
This will bring up the following listing, of which you really only need to worry about theDefault Issuer (Issuer Name in the wizard), and Default Key (Issuer Key in the wizard):
connection_info_listing 
Once you gather this information, you’re ready to have a copy/paste party and fill out the last page of the wizard (unless you really want to live life in hard mode, don’t enable client authentication for metadata exchange – if you feel the need to do that, you may as well pass around the raw WSDL to whomever needs it and just forget about a MEX endpoint):
publish_sbendpoint_part3
Once you’re up to this point, you can sprint to the finish by clicking NextCreate(after reviewing the wonderful WSDL and making sure it’s something that you can be proud of), and then finally Finish.

TACKLING COMMON ISSUES

Outside of the typical issues one might encounter hosting a WCF Service in a BizTalk Isolated Host (e.g., App Pool Identity needs permissions to Message Box database, correct .NET Framework version needs to be selected for App Pool, Receive Location must be started), you may also encounter a new one:
image 
Again, for those using Google-fu in attempt to resolve an error, the error message reads:
Invalid element in configuration. The extension name ‘transportClientEndpointBehavior’ is not registered in the collection at system.serviceModel/extensions/behaviorExtensions
And it’s highlighting the portion of the configuration file that includes the key for Service Bus authentication.
Before getting right to the resolution, let’s recap what we’re looking at. Going through the wizard, I had selected to host a WCF-WSHttp endpoint internally in a BizTalk Isolated Host (i.e., running in an IIS App Pool rather than a BizTalk Host Instance process). I then indicated that I wanted to also expose the service through a NetTcp relay endpoint hosted externally (on Windows Azure).
My local IIS instance has been provided all the configuration information that it needs to coordinate with Windows Azure and make the relay live, but it currently doesn’t know what to do with it – which is why I have the error, and why my relay won’t be alive yet.
In reality, this all could have been avoided by reading. Specifically reading the last page of the BizTalk WCF Service Publishing Wizard, which should tell you that you need to install the AppFabric 1.0 SDK before any of the relays will work. Again, this is functionality that was technically available in the previous generation, hence the older SDK version number.

HOW TO KNOW THAT IT’S WORKING

If you have made it this far successfully, hitting the local service endpoint should give you a page that looks something like this:
workingservice
If you go to the Windows Azure Management Portal and dig into the namespace you created, you should see something like this:
relay_azure

IT’S NOT REAL UNTIL I CAN CONSUME IT

If you’re anything like me, this is an unsatisfactory ending point – the service doesn’t really exist until I can consume it from some client. To make it as fair as possible, I am hosting the service inside a fairly locked down Windows Azure Virtual Machine, and I will be consuming it from my laptop connected ultimately via a microwave connection somewhere in the shadow of Mt. Pilchuk.
To consume this beast, we need to know our namespace (e.g., unique-name.servicebus.windows.net), and the mex endpoint exposed via relay (seen in the screenshot above). From there I can construct the address I would use in the Add Service Reference dialog in Visual Studio. In this case, that URL will be:https://unique-name.servicebus.windows.net/GetItemServiceDescription/GetItemService.svc_mex
Upon consuming the service, you may notice that the WSDL importer chokes hard on the WSDL it’s finding. It tries to build up a custom binding to make the call, and it’s finding that it doesn’t really know anything about some of the binding elements required:
choked_importer
Again for those searching for this specific error, the message reads:
WsdlImporter encountered unrecognized policy assertions in ServiceDescription ‘YOUR NAMESPACE HERE’
In reality, we don’t need to build a custom binding to make this all happen. Instead, we can use the netTcpRelayBinding to make the connection. An easy way to make that happen is to install the Windows Azure Service Bus NuGet package to our project. We can start out by using the Manage NuGet Packages context menu item in Solution Explorer:
manage_nuget_packages
Then search for the Windows Azure Service Bus package, and click the Installbutton:
manage_nuget_packages_part2
This should update the App.config file of your application to include the following WCF extensions:
appconfig
From there, you will want to update your endpoint to reference thenetTcpRelayBinding (instead of the custom binding that the WSDL importer failed to generate properly):
1
2
3
4
5
<client>
    behaviorConfiguration="sharedSecretClientCredentials"binding="netTcpRelayBinding"
    contract="RelayedItemService.ItemService"name="RelayEndpoint"/>
</client>
You will also notice above that we have assigned a behaviorConfiguration — one that currently does not yet exist. So next, we will need to add an endpoint behavior (inside the system.serviceModel section of the App.config) to perform client authentication (if you don’t want to re-use the same credentials as before, make that visit over to the ACS Management Portal that the Connection Information page is begging you to do):
1
2
3
4
5
6
7
8
9
10
11
<behaviors>
  <endpointBehaviors>
    <behaviorname="sharedSecretClientCredentials">
      <transportClientEndpointBehavior>
        <tokenProvider>
          <sharedSecretissuerName="owner"issuerSecret="YOUR SHARED SECRET VALUE HERE"/>
        </tokenProvider>
      </transportClientEndpointBehavior>
    </behavior>
  </endpointBehaviors>
</behaviors>
This is something that has changed more recently. In fact, I couldn’t find a single place documenting what this behavior should actually look like right now. Hopefully that will change.

INVOKING THE SERVICE

Once we get through all the configuration craziness, we’re ready to make quick work of calling the service with two lines of code (backed by a billion lines of configuration):
1
2
YourServiceDotNetNamespace.YourServiceClient client = newYourServiceDotNetNamespace.YourServiceClient("RelayEndpoint");
client.GetItem(newYourServiceRequest() { Id = "test"});
That’s all it takes.

Connecting Cloud to On premises - A cloudburst session by sam vanhoutte

$
0
0
post by sam vanhoutte 

This post contains cloud burst session video
In new scenarios, in which cloud is getting used, integration becomes very important. The Windows Azure platform provides a lot of different capabilities and services to make a secure link between your local systems and the Windows Azure services or machines. During this session, you will discover what the different technologies are and in what these are best applicable. You will learn more about the following technologies:
  • Connectivity on messaging level: Service Bus Messaging
  • Connectivity on service level: Service Bus Relay
  • Connectivity on data level: SQL Data Sync 
  • Connectivity on network level: Windows Azure Virtual Networking 
  • Connectivity on security level: Active Directory integration

Viewing all 56 articles
Browse latest View live